
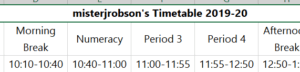
After following the directions in STEP 1, you should have something that looks kinda sorta like this:

If not, go back to the posts for your class and follow those directions until you do have something kinda sorta like that. You should ALWAYS FILL IN YOUR INFORMATION BEFORE YOU MAKE IT PURTY! Don’t start messing around with colours and pictures and stuff unless you’ve actually got something to purty up!
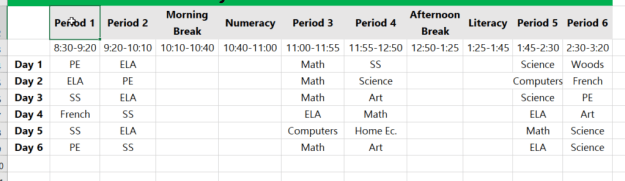
Now that we do have everything filled in, let’s make it purty!
See that top line? That’s a headline. Let’s make it stand out!

You can make it BOLD


use ITALICS


Underlining:

![]()
I like BOLD for a title, personally
But it should also be a little bigger as well


That looks better!
It might be nice to have things like the periods stand out as well, so I’ll BOLD those as well:

Time for a splash of colour!
As usual, click on any cell to select it

Look for the paint bucket to fill

and choose your colour 

But say you don’t want to do things cell by cell (who would?) You can select a range of cells by clicking and dragging (or clicking then holding down Shift or Ctrl and then clicking on another)
Let’s say that you like the look of a cell and you want other cells to look the same way (same font, size, colour, shading, etc.). Select a cell (like my Period 1)

Double click on something called the Format Painter

You’ll see a dotted line around the cell that you’re going to copy the formatting from

and then you can go and click (paint) to apply that formatting elsewhere
 becomes
Now the two areas match

I like to make all of my subjects look different, but all of the classes for each subject look the same. Choose a look for one of your subjects

And double click that Format Painter 

Go paint that on the rest of the classes for that subject

Carry on and do the rest of your courses!

One thing to watch for. Sometimes if you fill a cell with a dark colour, your text will be rather hard to read

So you might have to switch to a lighter colour for your text 
Something else that makes things look a lot better is having borders around the cells. When we used Word, they were already there, but here, not so much, so you have to turn them on
Select your cells but DO NOT INCLUDE ANY EMPTY CELLS

Beside the Shading paint bucket there’s an option to change your borders.

Much better!

You may wish to Merge some of those big blocks. You may have different things going on in your schedule on different days of the cycle, but probably not. If you go to Pokemon Club every Day 2, maybe you want to put that in, but if not, how about one big lunch break. Once again you can select a range of cells:

And use Merge & Center to join them


Or perhaps you just want to hide the borders and still have individual cells there:

Maybe you want to label those

If you want, you can change the orientation of the text in the cell. Select it:


The only thing left is to add some logos/pictures!
You may wish to add a GWMS logo. You can get those from HERE
OR
You can go to my LINKS page (or your class Assignments page)

Find a logo you like (.png is my favourite because it has a transparent background, but .jpg will work too)

Click on whichever logo you like

Then at the top right corner, click on Download, then Direct download

Depending on your browser, it will probably go directly into your Downloads folder. If you get a window like this (Firefox), make sure you Save the file

Go back to your spreadsheet and click Insert

then Pictures

Look in youur Downloads folder for the file and Insert it from there

You can click on it and move it easily

But it’ll likely be rather large, so you’ll have to resize by grabbing a corner and pulling in. Please HOLD SHIFT while resizing, so the shape of the picture doesn’t distort!

Put in as many photos/logos as you like, but make sure that you can still read/use your timetable!
As always, SAVE your work!
There’s one more nifty step! You’ll have to drop off an Excel file (.xls) AND a .pdf file. We’ll show you how to do that in the next set of instructions!
